
今回はいよいよ機械学習の本題、ニューラルネットワークによる学習と推論処理を実装していきます。
1本のソースコードでデータ収集から学習、推論までの一連の処理を完結するというところを焦点に解説します。
また、本記事は「Kerasでディープラーニング!Pythonで始める機械学習入」シリーズの手順を解説するページです。シリーズの一覧は以下をご覧ください。

機械学習の準備
機械学習をするにあたり、まずはデータセットに使用する画像データの収集や、訓練データとテストデータの前処理などの準備をする必要があります。
各工程での手順を以下の記事でまとめていますので、あわせてご覧ください。


Kerasをインストールする
Kerasをインストールするため以下のコマンドを実行します。
pip install kerasニューラルネットの層を定義する
データの前処理が終わったら、ニューラルネットの層を定義していきます。
Dense、Activation、Dropoutをレイヤーとして重ねていくことで相を構築していきます。
Dense
Denseは全層結合で、層内の全てのニューロンが次の層の全ニューロンと接続されます。
Activation
Activationは活性化関数を表しています。
今回は活性化関数に「relu」=ReLu関数(ランプ関数)と、「softmax」ソフトマックス関数を使用しました。
Dropout
Dropout(ドロップアウト)は、意図的に一定割合のノードを使わないようにするための層で、ランダムで指定された割合の出力値を0にします。
#層を定義
model = models.Sequential()
model.add(Dense(512, activation='relu', input_shape=(10800,))) #activationは活性化関数
model.add(Dropout(0.2))
model.add(Dense(512, activation='relu'))
model.add(Dropout(0.2))
model.add(Dense(2, activation='softmax')) #第1引数分類させる数
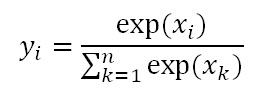
softmax関数とは
ニューラルネットワークは分類問題と回帰問題に用いることができますが、どちらに用いるかにより、出力層の活性化関数を決定します。今回のような分類問題では上記の層の定義のサンプルにもあるようにsoftmax関数を使用します。
softmax関数はベクトルを入力とし、0から1の値をとる同じ次数のベクトルを出力します。その出力は確率値として解釈することができます。
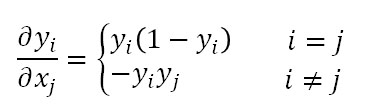
softmax関数の微分は以下の通りです。
モデルを学習する
Kerasのfitメソッドを使い、学習を実行します。
また、EarlyStoppingオブジェクトを使ってモデルの改善が止まった時点で学習を停止させることができます。
#EaelyStoppingの設定
early_stopping =  EarlyStopping(monitor='val_loss', min_delta=0.0, patience=2)

#モデルを学習させる
log = model.fit(x_train, y_train, epochs=100, batch_size=10, verbose=True, validation_data=(x_test, y_test), callbacks=[early_stopping])
モデル評価
テスト用データセットで学習済分類器に入力し、パフォーマンスを計測します。
test_loss, test_accuracy = model.evaluate(x_test, y_test, verbose=0)
作成したソースコード
実際に作成したソースコードは以下の通りです。
from icrawler.builtin import BingImageCrawler
import glob
import cv2
from sklearn.model_selection import train_test_split
from tensorflow import keras
from tensorflow.keras.utils import to_categorical
import pandas as pd
import numpy as np
from sklearn.model_selection import train_test_split
import tensorflow as tf
from tensorflow import keras
from tensorflow.keras import layers, models
from keras.layers import Dense, Dropout
from keras.callbacks import EarlyStopping


#クワガタの画像を収集
crawler = BingImageCrawler(storage={"root_dir":"images"}) #ダウンロード先のディレクトリを指定
crawler.crawl(keyword="クワガタ", max_num=50) #クロール実行

#カマキリの画像を収集
crawler = BingImageCrawler(storage={"root_dir":"images2"}) #ダウンロード先のディレクトリを指定
crawler.crawl(keyword="カマキリ", max_num=50) #クロール実行

#全ての画像ファイルのパスを取得する
files1 = glob.glob("images/*.jpg")
files2 = glob.glob("images2/*.jpg")

files1[len(files1):len(files2)] = files2

#画像データを格納するりすと
image_list = []

#ファイルパスから画像を読み込み
for imgpath in files1:
  image = cv2.imread(imgpath) #画像を読み込み
  image = cv2.resize(image, (60, 60)) #画像のサイズを変更

  #正規化
  image = image / 255 #[0~1]にスケーリング

  #画像をリストに追加
  image_list.append(image)

#ラベルを作成する
label_list = []
label_list2 = []

#50ずつ作成
for i in range(50):
    label_list.append("stag_beetle")

for i in range(50):
    label_list2.append("mantis")

#ラベルを統合
label_list[len(label_list):len(label_list2)] = label_list2

#学習データとテストデータを作成
x_train, x_test, y_train, y_test = train_test_split(image_list, label_list, test_size=0.2) #20件をテストデータ、それ以外を学習データに分ける


#テーブルデータを作成
columns = ['type'] #列名を指定
df_train = pd.DataFrame(y_train,  columns=columns)
df_test = pd.DataFrame(y_test, columns=columns)
print("--TableData--")
print("train df = \n", df_train)
print("test df = \n", df_test)

# 文字列(カテゴリ変数)をダミー変数に変換
y_train = pd.get_dummies(df_train)
y_test = pd.get_dummies(df_test)
print("--dummies--")
print("train dummies = \n", y_train)
print("test dummies = \n", y_test)

#リスト型を配列型に変換
x_train = np.array(x_train)
x_test = np.array(x_test)

x_train = x_train.reshape(80, 10800) #60×60×3(RGB)
x_test = x_test.reshape(20, 10800)

#層を定義
model = models.Sequential()
model.add(Dense(512, activation='relu', input_shape=(10800,))) #activationは活性化関数
model.add(Dropout(0.2))
model.add(Dense(512, activation='relu'))
model.add(Dropout(0.2))
model.add(Dense(2, activation='softmax')) #第1引数分類させる数

#モデルを構築
model.compile(optimizer=tf.optimizers.Adam(0.01), loss='categorical_crossentropy', metrics=['accuracy'])

#EaelyStoppingの設定
early_stopping =  EarlyStopping(monitor='val_loss', min_delta=0.0, patience=2)

#モデルを学習させる
log = model.fit(x_train, y_train, epochs=100, batch_size=10, verbose=True, validation_data=(x_test, y_test), callbacks=[early_stopping])

#モデルを評価する
test_loss, test_accuracy = model.evaluate(x_test, y_test, verbose=0)
print('損失:', test_loss)
print('評価:', test_accuracy)
実行結果
実行結果は以下の通りです。
2022-06-07 20:36:35,741 - INFO - icrawler.crawler - Crawling task done!
--TableData--
train df =
            type
0   stag_beetle
1   stag_beetle
2   stag_beetle
3   stag_beetle
4        mantis
..          ...
75       mantis
76       mantis
77       mantis
78  stag_beetle
79       mantis

[80 rows x 1 columns]
test df =
            type
0        mantis
1   stag_beetle
2        mantis
3   stag_beetle
4   stag_beetle
5   stag_beetle
6   stag_beetle
7   stag_beetle
8        mantis
9   stag_beetle
10       mantis
11  stag_beetle
12       mantis
13       mantis
14       mantis
15  stag_beetle
16  stag_beetle
17       mantis
18  stag_beetle
19  stag_beetle
--dummies--
train dummies =
     type_mantis  type_stag_beetle
0             0                 1
1             0                 1
2             0                 1
3             0                 1
4             1                 0
..          ...               ...
75            1                 0
76            1                 0
77            1                 0
78            0                 1
79            1                 0

[80 rows x 2 columns]
test dummies =
     type_mantis  type_stag_beetle
0             1                 0
1             0                 1
2             1                 0
3             0                 1
4             0                 1
5             0                 1
6             0                 1
7             0                 1
8             1                 0
9             0                 1
10            1                 0
11            0                 1
12            1                 0
13            1                 0
14            1                 0
15            0                 1
16            0                 1
17            1                 0
18            0                 1
19            0                 1
2022-06-07 20:36:46.469877: W tensorflow/stream_executor/platform/default/dso_loader.cc:64] Could not load dynamic library 'nvcuda.dll'; dlerror: nvcuda.dll not found
2022-06-07 20:36:46.495207: W tensorflow/stream_executor/cuda/cuda_driver.cc:269] failed call to cuInit: UNKNOWN ERROR (303)
2022-06-07 20:36:46.540828: I tensorflow/stream_executor/cuda/cuda_diagnostics.cc:169] retrieving CUDA diagnostic information for host: DESKTOP-G32VL2N
2022-06-07 20:36:46.558624: I tensorflow/stream_executor/cuda/cuda_diagnostics.cc:176] hostname: DESKTOP-G32VL2N
2022-06-07 20:36:46.572370: I tensorflow/core/platform/cpu_feature_guard.cc:151] This TensorFlow binary is optimized with oneAPI Deep Neural Network Library (oneDNN) to use the following CPU instructions in performance-critical operations:  AVX AVX2
To enable them in other operations, rebuild TensorFlow with the appropriate compiler flags.
Epoch 1/100
8/8 [==============================] - 2s 79ms/step - loss: 151.6039 - accuracy: 0.5000 - val_loss: 10.6280 - val_accuracy: 0.4000
Epoch 2/100
8/8 [==============================] - 0s 46ms/step - loss: 8.0136 - accuracy: 0.4375 - val_loss: 7.1728 - val_accuracy: 0.4000
Epoch 3/100
8/8 [==============================] - 0s 37ms/step - loss: 5.5108 - accuracy: 0.5500 - val_loss: 4.1203 - val_accuracy: 0.4000
Epoch 4/100
8/8 [==============================] - 0s 36ms/step - loss: 2.1891 - accuracy: 0.6750 - val_loss: 1.1173 - val_accuracy: 0.5500
Epoch 5/100
8/8 [==============================] - 0s 36ms/step - loss: 1.2950 - accuracy: 0.6625 - val_loss: 0.7917 - val_accuracy: 0.5500
Epoch 6/100
8/8 [==============================] - 0s 35ms/step - loss: 1.4776 - accuracy: 0.6375 - val_loss: 1.2942 - val_accuracy: 0.5000
Epoch 7/100
8/8 [==============================] - 0s 36ms/step - loss: 0.6777 - accuracy: 0.6875 - val_loss: 0.5071 - val_accuracy: 0.6000
Epoch 8/100
8/8 [==============================] - 0s 34ms/step - loss: 0.4781 - accuracy: 0.7625 - val_loss: 0.6817 - val_accuracy: 0.6000
Epoch 9/100
8/8 [==============================] - 0s 35ms/step - loss: 0.5179 - accuracy: 0.7750 - val_loss: 0.8477 - val_accuracy: 0.7500
損失: 0.847650408744812
評価: 0.75
プログラムを実行するとモデルの評価結果が表示されました。
損失(値が小さいほど良い)、評価ともまだまだ改良の余地ありという結果でした。

まとめ
今回のプログラムで機械学習の一連の処理を動作させることができました。
モデルの実用には改良が必要ですので、次回以降の記事で学習させるデータや層の構造を調整していきたいと思います。
機械学習を効率よく学びたい方には、自分のペースで動画で学べるUdemyの以下の講座がおすすめです。数学的な理論からPythonでの実装までを習得できます。(私自身もこの講座を受講しています)

また、以下の記事で効率的にPythonのプログラミングスキルを学べるプログラミングスクールの選び方について解説しています。最近ではほとんどのスクールがオンラインで授業を受けられるようになり、仕事をしながらでも自宅で自分のペースで学習できるようになりました。
スキルアップや副業にぜひ活用してみてください。

スクールではなく、自分でPythonを習得したい方には、いつでもどこでも学べる動画学習プラットフォームのUdemyがおすすめです。
講座単位で購入できるため、スクールに比べ非常に安価(セール時1200円程度~)に学ぶことができます。私も受講しているおすすめの講座を以下の記事でまとめていますので、ぜひ参考にしてみてください。

それでは、また次の記事でお会いしましょう。


コメント